
How To Make Pizza In Microwave Oven In No Time
Ah, pizza. One of the most beloved foods worldwide. From the crispy crust, rich sauce, and melted cheese, to the variety of toppings that can cater to any palate. While traditional ovens are commonly used to bake this delectable dish, did you know that a microwave oven can also whip up a delicious pizza? Let’s embark on a mouth-watering journey to learn how to make pizza in microwave oven, whether you’re using a microwave convection oven or just a standard one.
1 How to Bake Pizza in Microwave oven?
List of Ingredients You'll Need
- Pizza Dough: The foundation of any delicious pizza. For this, you can either purchase ready-made pizza dough or prepare homemade yeast pizza dough using all-purpose flour, warm water, and yeast.
- Pizza Sauce: Store-bought or homemade, your choice.
- Toppings: Anything from onions, baby corn, and mushrooms, to any veggies of your preference.
- Cheese: Preferably mozzarella cheese, but feel free to mix and match!
How to Make the Pizza Dough?
The pizza crust is where the magic begins. Let’s guide you through making homemade pizza dough:
- In a big bowl, mix about two cups of all-purpose flour (or purpose flour, if you will) with a pinch of salt.
- To the bowl, add a sachet of yeast (about 7 grams) dissolved in warm water. The warmth is essential, especially in the winter season, to activate the yeast. Mix until a dough ball forms.
- Drizzle some olive oil, then knead the dough using your hands until it’s smooth and elastic.
- Cover the bowl with a damp cloth and set aside for fermentation. This can take a bit longer in cold weather, but usually, an hour should suffice.
For those in a rush, a baking powder variant is available. Just replace the yeast with a teaspoon of baking powder.
Homemade Pizza Sauce Recipe
Ingredients:
- 1 can (28 oz) of whole tomatoes (or crushed tomatoes)
- 2-3 cloves garlic, minced
- 2 teaspoons olive oil
- 1 teaspoon dried oregano
- 1 teaspoon dried basil (or you can use fresh basil, finely chopped)
- 1/2 teaspoon sugar (optional, to counter the acidity of the tomatoes)
- 1/2 teaspoon onion powder (or 1 small onion, finely chopped)
- 1/4 teaspoon black pepper
- Salt, to taste
- Red pepper flakes (optional, for a spicy kick)
- 1 small carrot (optional, for natural sweetness)
- 1 bay leaf (optional, for added flavor)
- 2 tablespoons fresh parsley, chopped (optional)
Procedure:
- Tomato Preparation: If using whole tomatoes, blend them in a blender or food processor to get a smooth puree. If you like your sauce a bit chunky, pulse just a few times to achieve the desired consistency.
- Sauté: In a saucepan, heat the olive oil over medium heat. Add the minced garlic (and onions if using) and sauté until they become soft and translucent, but not browned.
- Add Tomatoes: Pour in the tomato puree and stir well.
- Season: Add oregano, basil, sugar (if using), onion powder, black pepper, and salt. If you’re adding red pepper flakes for some heat, now is the time to sprinkle them in. If you’re using a bay leaf for added depth of flavor, drop that in too.
- Carrot Trick: If you’re using a carrot for natural sweetness, grate it finely and add it to the sauce. It not only brings in a touch of sweetness but also helps to neutralize the acidity of the tomatoes.
- Simmer: Let the sauce simmer on low heat for about 20-30 minutes. Stir occasionally. The sauce will thicken as it simmers.
- Final Touch: If you’re adding fresh parsley, stir it in just before you turn off the heat.
- Cool & Store: Once the sauce has cooled down, you can store it in an airtight container in the refrigerator for up to a week.
Classic Pizza Crust Recipe
Ingredients:
- 2 1/4 teaspoons (1 packet) active dry yeast
- 1 1/2 cups warm water (110°F or 45°C)
- 3 1/2 to 4 cups all-purpose flour, plus more for dusting
- 2 tablespoons olive oil
- 2 teaspoons sugar
- 2 teaspoons salt
Procedure:
- Activate the Yeast: In a bowl, dissolve the sugar in warm water. Sprinkle the yeast over the water and let it sit for about 5-10 minutes, or until the mixture becomes frothy. This indicates that the yeast is active.
- Mixing the Dough: In a large mixing bowl, combine the flour and salt. Create a well in the center and pour in the yeast mixture and olive oil. Using a spoon or your hands, gradually mix the flour into the wet ingredients until a dough begins to form.
Kneading: Place the dough on a floured surface and knead for about 5-7 minutes, or until the dough is smooth and elastic. You can add a bit more flour if the dough feels too sticky, or a bit of water if it feels too dry. - First Rise: Oil a large bowl with a bit of olive oil. Place the kneaded dough in the bowl and cover it with a damp cloth. Allow the dough to rise in a warm place for about 1-1.5 hours, or until it has doubled in size.
- Shaping the Crust: Once the dough has risen, punch it down to release any air bubbles. Transfer it to a floured surface. Using a rolling pin, roll the dough to your desired thickness. Typically, for a standard pizza, you’d aim for about 1/4-inch thick, but if you like thin crust or deep-dish, adjust accordingly.
- Preheat: Preheat your oven according to your pizza recipe, typically around 475°F (245°C) for most home ovens.
- Baking: Transfer the rolled dough to a pizza stone or a baking sheet. If you’re using a baking sheet, you might want to dust it with some cornmeal or flour to prevent sticking. Add your desired toppings and bake in the preheated oven. The baking time will depend on your specific oven and how thick your crust and toppings are, but generally, it’ll be around 12-20 minutes.
- Cool and Serve: Once baked to a golden brown, remove the pizza from the oven. Allow it to cool for a few minutes before slicing and serving.
Tips:
- For a crispier crust, pre-bake the crust for about 5-7 minutes before adding toppings and then bake again.
- For an added touch, you can brush the crust edges with some olive oil or garlic butter just before baking.
- If you want a whole wheat crust, you can replace half of the all-purpose flour with whole wheat flour.
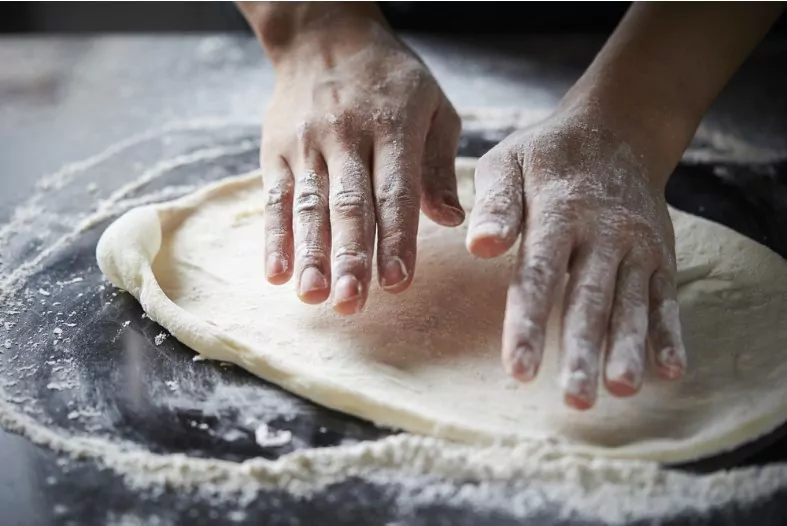
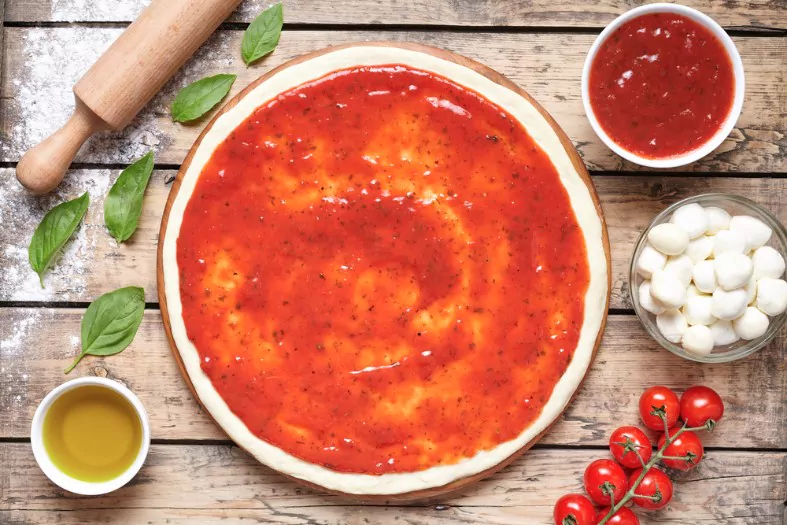
Preparing Your Pizza Base and Toppings
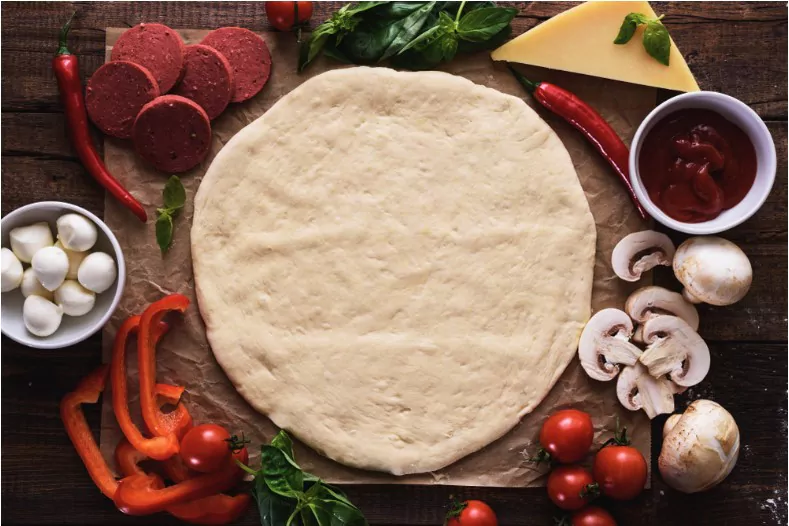
- After the fermentation time, sprinkle some flour on your countertop. Using a rolling pin, roll out the dough ball to form your pizza base.
- If you want a thin crust, roll it out thinly. For those who love a thick crust, leave it a tad thicker.
- For toppings, chop your veggies — onions, baby corn, mushrooms, and whatever else your heart desires.
- Grate the mozzarella cheese, and have your pizza sauce ready to spread.
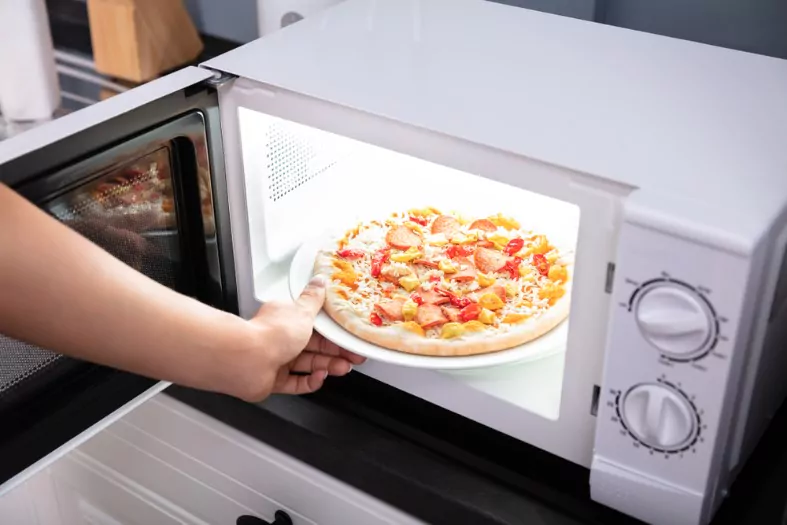
2 Making Pizza in a Microwave Oven
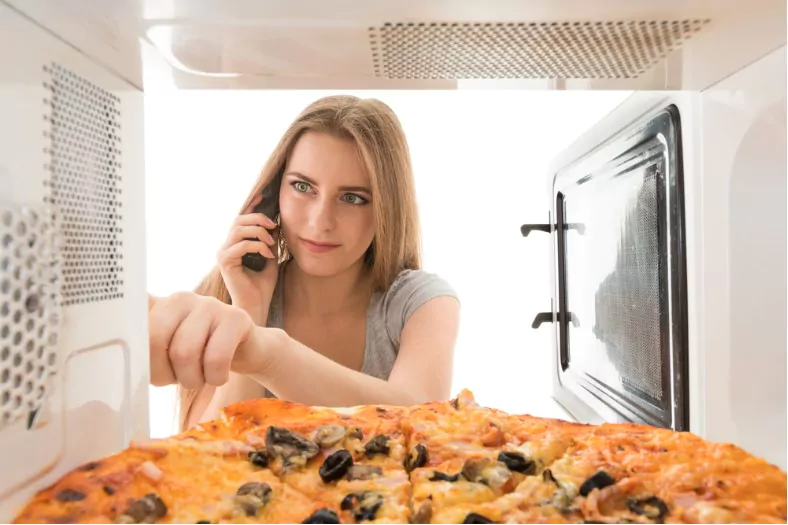
This is where our key player, the microwave oven, comes in. Whether you’re using a standard microwave or a microwave convection oven, the process is surprisingly straightforward:
- If using a convection mode microwave, preheat it to a pre-defined temperature of about 200°C (392°F).
- While it’s heating up, take a greased baking dish or any microwave-safe dish. You can use greased oil or parchment paper to ensure the pizza doesn’t stick.
- Carefully place your rolled-out pizza base onto the dish.
- Using a fork, make small cuts on the pizza base. This prevents it from puffing up unevenly.
- Spread a generous amount of pizza sauce over the crust.
- Sprinkle your toppings, and then add a lavish amount of cheese. After all, the moment when the cheese melts is what makes a pizza so satisfying!
- Now, place the pizza inside your microwave oven. If you’re using a standard microwave, cook the pizza for about 5-7 minutes. For microwave convection ovens, it might take a bit longer – around 10-12 minutes, but make sure you set it on the convection mode.
- Monitor the cooking time. Once the cheese melts and turns a bit golden, and the edges of your crust appear crispy, your microwave pizza is ready.
Serve Hot and Enjoy

The aroma wafting from a freshly cooked pizza is unmatched. Serve hot, slice it up, and enjoy a homemade pizza made right in your microwave. The convenience of microwave recipes, especially when making pizza, cannot be overstated.
Pro Tip: Always keep an eye out for a new video tutorial or pizza recipe. The world of pizza-making is vast, and there’s always something new to learn. Moreover, remember that while this recipe uses water, some variants might ask for milk to make the dough softer.
3 Wrapping Up
Making pizza in a microwave isn’t just convenient; it opens a whole new video of microwave recipes. From the classic pizza crust to various toppings, you can experiment endlessly. While the cooking time may vary, the end product – a delicious pizza served hot, is the ultimate comfort food.
For those adventurous souls, switching up ingredients, using different cheeses, or even adding a drizzle of milk can make your homemade pizza even richer.
So, the next time you’re in a bind or craving pizza, remember this guide. With your microwave oven at hand, a delicious pizza is just minutes away! We hope that this blog on how to make pizza in microwave oven helps you cook the best pizza you ever had!
Note: Always keep safety in mind. Microwaves can get very hot, so use mitts when removing your dish. Happy cooking!
If you like these kind of delicious recipes, be sure to check out our blogs on how to make tasty restaurant like Paneer Chilli and Shahi Paneer at home!
Community Q&A
About This Article

This article has been viewed 401 times.

Featured Articles
 How to Make Crispy Dosa at Home? Crispy Dosa Recipe
 How to Whip Cream in Mixer Grinder [6 Easy Steps!]